Elevate Your Interior Design with Acoustic Slat Wall PanelsElevate Your Interior Design with Acoustic Slat Wall Panels
May 9, 2025 0 Comments 12:00 am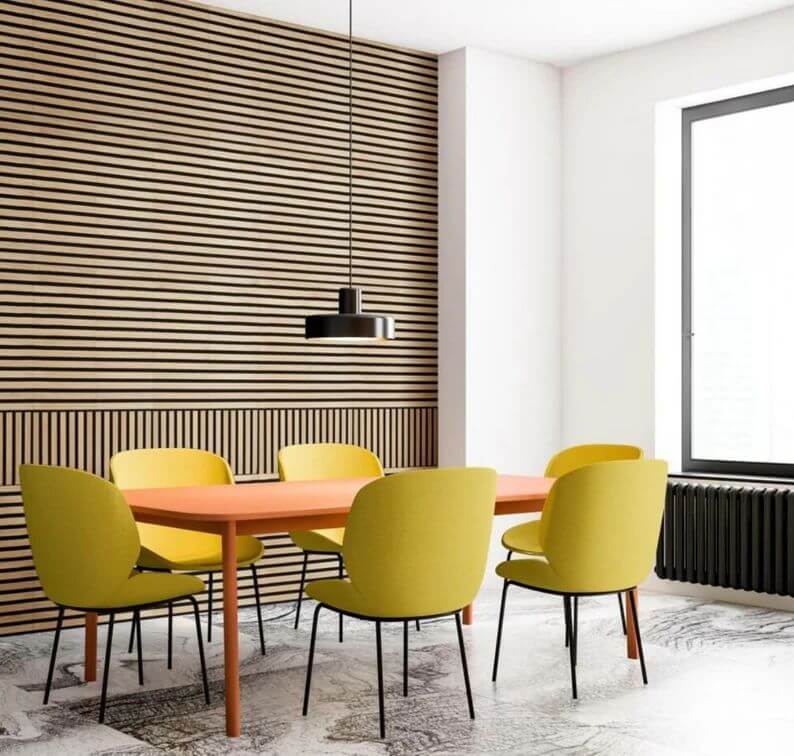
Elevate Your Interior Design with Acoustic Slat Wall Panels
Why Acoustic Slat Wall Panels Are the New Interior Design Staple
Acoustic slat wall panels are becoming more and more well-liked as a chic and useful design option, particularly for people who want to improve their homes’ visual and aural appeal. These panels provide the perfect balance of style and functionality, whether you’re remodeling your living room from top to bottom, turning a plain home office into an exciting and productive workstation, or just giving a space a new, contemporary makeover. Acoustic slat wall panels, which are made from premium materials and come in a range of finishes, including walnut and oak, provide a cozy, textured appearance that goes well with almost any home design, from rustic to minimalist. Beyond their aesthetic appeal, they have two functions: they absorb background noise, lessen echo, and greatly enhance room acoustics. This makes them particularly useful in open-plan houses or multipurpose spaces where noise management can be difficult. Adding acoustic slat wall panels to your design does more than simply adorn a wall; it creates a more tranquil, well-balanced, and exquisitely designed space. Incorporating
into your next renovation could transform both the look and feel of your space.
Design Meets Function: The Benefits of Acoustic Slat Wall Panels
To create acoustic slat wall panels, medium-density fiberboard (MDF) slats adhere to a recycled felt backing. This combo improves your space in several ways.
Visual Warmth and Modern Style
- Natural wood finishes like walnut or oak
- Vertical or horizontal layout options
- Seamless integration with shelving or hooks
Acoustic Performance That Works
- Reduces echoes in open rooms
- Absorbs sound for a quieter space
- Ideal for home offices, studios, and entertainment rooms
Simple Installation for DIY or Pros
Acoustic slat wall panels are easy to install for both experts and do-it-yourselfers.
Three Installation Methods
- Direct to Wall—Use screws (black screws work best for blending into the felt backing).
- Adhesive mounting provides a less permanent solution.
- Over Battens—Increases acoustic performance by leaving an air gap.
Tools You Might Need
- Electric saw (for cutting around outlets or fixtures)
- Measuring tape
- Screwdriver or drill
Versatile and Customizable for Every Space
The ease of customization of acoustic slat wall panels is one of its finest features. These panels adjust wonderfully to any complicated arrangement or unusual wall size. Many homeowners are turning to
solutions to balance sound and style effortlessly.
Creative Uses
- Feature wall in your living room
- Backdrop for a home theater setup
- Acoustic solution in a recording studio
Coordinated Accessories
You may precisely and elegantly finish your design with shelves, hooks, and finishing trimmings from Wood Veneer Hub that match your panels. Incorporating
into your next renovation could transform both the look and feel of your space.
What to Know Before You Install
Preparation is key when working with acoustic slat wall panels. Here’s a list of considerations to ensure your project goes smoothly:
- Room Conditions: Install in dry, climate-controlled areas to prevent warping.
- Wall Prep: Clean and level the surface before mounting.
- Safety First: Cut panels outdoors or in ventilated spaces due to dust from felt and MDF.
Common Mistakes to Avoid
- Not locating studs before screwing in
- Forgetting to leave space for wall fixtures
- Using incompatible screws or adhesives
FAQ: Acoustic Slat Wall Panels Explained
What are acoustic slat wall panels made of?
To absorb sound and lessen noise, they are made of wood veneer MDF slats affixed to a layer of recycled acoustic felt.
How effective are acoustic slat wall panels?
They’re excellent at minimizing echoes and improving sound quality, especially when installed over battens.
Can I cut the panels myself?
Yes, with the appropriate equipment, such as an electric saw. Just use safety gear and take precise measurements.
Are they suitable for rental homes?
These are perfect for renters since adhesive mounting enables non-permanent installation.
Do they require maintenance?
Minimal maintenance is needed. Simply dust or wipe with a damp cloth occasionally.
Summary: Why Choose Acoustic Slat Wall Panels
Acoustic slat wall panels provide a novel combination of style and functionality. These panels offer a simple and stylish solution whether you’re looking for enhanced room acoustics, visual impact, or both. They are a valuable addition to any area since they provide flexibility and long-term advantages from design to installation. Incorporating top decor trends into ad creative is a proven tactic in digital marketing for lifestyle brands.
Key Features at a Glance
Design Benefits
- Contemporary aesthetics
- Rich wood textures
- Seamless add-ons
Performance Advantages
- Reduces reverberation
- Improves voice clarity
- Enhances media sound quality
Installation Perks
- Multiple mounting options
- DIY-friendly
- Customizable sizing
